

Tuesday 28 September 2010
Technicalities
Monday 27 September 2010
Ocean quilt
Having sent off instructions for two quilts last nihgt, today I decided I needed to do some actual quilting. I want to get the Beach pattern done soon, but I haven't sewn for a while.

Well, I have made a few in-progress steps to be photographed to go with the instructions - but they don't count! And to be completely honest, tonight's 'sewing' was actually all about fabric selection and cutting.
I'm building my next beach quilt (which is really more an ocean quilt, since there's no sand!), and all these fabrics are pinned in place on the foundations, ready to sew. This lot took about 2 hours, and I've done nearly half the water. On looking at the photo, I've already swapped a few pieces which don't transition smoothly to the next fabric; one right in the centre and one to the right, which are both too dark and show a marked 'line' between them and a neighbouring print.

I've taped the pattern up over the window behind the sewing table for reference, which I'm finding really handy. It works well at night, but in the daytime it would block a lot of the natural light.
Sunday 26 September 2010


Eleanor in the Sun
I've been sorting through some photos this evening (morning?!) and realised I haven't posted many of James and Eleanor recently, so I'm doing some catching up posts...

These were taken on a lovely, sunny Tuesday a few weeks ago. I'm at home on Tuesdays amd James is at kindergarten until 3, so I get some time to concentrate on Eleanor. She had a lovely time exploring...

picking leaves...

hiding...

peeking...

swinging...

and finding ways to negate the trampoline's safety-net!

Wearable Flowers
The the Adelaide SHow this year, there was again a display of Jenny Gillies' wearable blooms. Jenny was featured in the latest issue of Australian Patchwork and Quilting (Vol 19 No 7) and her work is stunning. Our time at the show was cut short by illness (both kids were off colour, and it was when my 'flu chose to assert itself), so we didn't see the live show (although photography is not permitted fo that anyway). But there was a display of some of her work on mannikins, and I snapped a few quick photos before we went home.
This is a child-size version of her Iris costume.

Just look at the detail of the hat!

Nasturtiums...


Dahlia head-piece:

Skirt detail:

There were also some amazing fruits, but I was lacking in enthusiasm and energy by this point!
This is a child-size version of her Iris costume.

Just look at the detail of the hat!

Nasturtiums...


Dahlia head-piece:

Skirt detail:

There were also some amazing fruits, but I was lacking in enthusiasm and energy by this point!
Thursday 23 September 2010
Beach quilt spotted!

My quilting friend AJ was the winner of Footsteps in the raffle a while back. She has recently moved house, and has just hung the quilt on her son's wall. I'm so pleased she has such a great place to hang it! And I was also pleased to note that the nappy stacker (bottom right in the third photo) uses some of the same turtle fabric I used! This quilt obviously went to the right home!
Monday 20 September 2010
DQS9 received
Today my quilt from the DQS9 Flickr swap arrived. This lovely quilt was made by Pam of uberstitch.
.jpg)
It makes me think of a snow-covered village at sunset, and I just love the bare tree she quilted over the village. It's quilted in a metallic coppery thread, and is wonderfully effective.
.jpg)
Pam completely, totally and utterly spoiled me, with over 2 yards of fabrics! She's obviously been stalking well, and lots of these will be perfect for my beach quilts. She also included a cute little sewing kit, and some fun post-its which are always handy - provided I can keep two small pairs of hands away from them!

Thank you Pam! Now to look forward to DQS10...
.jpg)
It makes me think of a snow-covered village at sunset, and I just love the bare tree she quilted over the village. It's quilted in a metallic coppery thread, and is wonderfully effective.
.jpg)
Pam completely, totally and utterly spoiled me, with over 2 yards of fabrics! She's obviously been stalking well, and lots of these will be perfect for my beach quilts. She also included a cute little sewing kit, and some fun post-its which are always handy - provided I can keep two small pairs of hands away from them!

Thank you Pam! Now to look forward to DQS10...
Fabric imitations
I just wanted to draw you attention to some cheap and tacky knock-offs of Tula Pink's gorgeous fabrics being sold at a ubiquitious American chain store. Head over to Tula's blog for more information and to lend her your support.
 Above is a sample image borrowed from Tula's blog, showing the imitation on the left. Disgusting imitation fabric, and disgusting behaviour!

Elephant quilt preview
Even though it's late, and I only have photos taken prior to binding this quilt (taken outside while James and Eleanor were on the trampoline) I couldnt wait to share it! This is the quilt using the elephant flannel that Valori sent me, for my sister's baby boy Edward.

I had wanted to use more of Valori's flannel prints which I already had, but in the end they detracted from the elephants, so I used a few for the triangles, then added a subtle blue.

I used one of my new quilting stencils in the non-elephant blocks. Flannel is hard to mark on, and unfortunately ym new poiunce, which would have been much easier, didn't show up on the mottled blue fabric - partly because it's quite pale, but also I suspect because of the flannel fabric. I'll have to test the pounce on another quilt.
I finished the binding tonight and will add the label tomorrow.
Jindy - my snuggle quilt
I have finally finished Jindy, my snuggle quilt, just as the weather is starting to warm up! Oh well, it will still be nice on the sofa, and will be ready for next winter!

I made it because I loved James and Eleanor's Giggle and Hoot quilts, and needed something for cold evenings on the sofa - on the rare occasions I'm not quilting! Or for afternoon naps when I've been up too late quilting the night before...

It's made entirely from flannel. About half are Valori Wells' fabrics, including her gorgeous owls from the Della range, some Sole, and some Urban Flannels. There are also a few Amy Butler Love prints, Sandi Henderson's Ginger Blossom and Farmer's Market, a plain white, and a few snowflake prints.


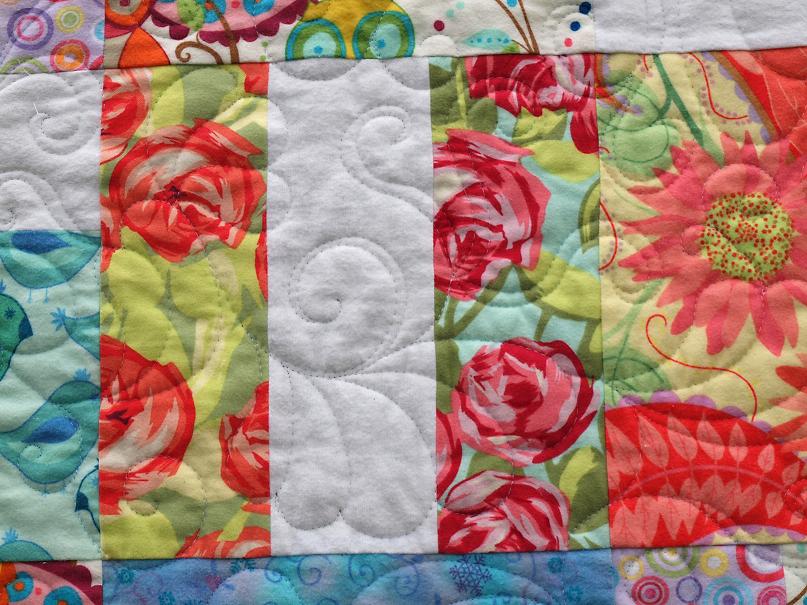
I used the feathery/swirly quilting design again on this quilt; it's becoming quite a favourite!

Here's a closer look:


Saturday 18 September 2010
Quilt Labels
My first quilts went completely unlabelled. Then I started embroidering my initials and the year into the binding. Then I realised the importance of labelling my work properly, and discovered printable fabric sheets.
My preferred brand is Matilda's Own, an Australian brand which is beautiful quality. Printed Treasures is also excellent, and Electric Quilt do a beautiful heiroom quality Cotton Lawn - although that's rather expensive. If you want a pure white try June Tailor, but I find her sheets a bit stiff, and they aren't cut evenly across the weave, so need to be tugged back into shape after rinsing. In Australia, you'll pay about $30 for a pack of 5 A4/Letter sheets. There are cheaper brands around, at about half the price, but I've found them rubbishy, and wouldn't waste my money on them. You do need to be careful about washing the labels - use a mild detergent, and dissolve it in the water before immersing the quilt.
While you can cut the sheets before printing them, I find it best to work with full-size sheets. Depending on the labes size, I fit anywhere between 2 and 5 labels per sheet, and try to do a whole sheet-full at a time. Always do a test-print in black-and white on plain paper to ensure the labels fit, with a seam allowance all around. The fabric sheets may need help to feed them into the printer - follow the instructions on the packet. Sometimes a strip of masking tape across the leading edge on the back helps feed it in properly.
Since late 2007, all my quilts have a personalised label, printed with my inkjet printer, and invisibly hand-stitched to the back of the quilt. In that time I have increased the amout of information I include, and most labels include:
I often base my labels on a photo - I love to use a newborn photo for baby's quilts, for example. You need a photo of reasonable resolution (probably about 1000 pixels across, depending on the finished size). I often edit my photos in Photo Shop first, making them very sharp and vivid (possibly more than I usually would for regular viewing or printing). The photo also needs to have enough open space for the text - this needs to be plain enough that the words can be clearly read, so a single colour, with minimal variation in tone, and not highly textured.
Inspiration for my quilt names and labels come from the designs, the reason it was made, colours used and other sources. Sometimes it's hard to come up with a name. Sometimes the name inspires the label. Sometimes I even use an image of the quilt (often edited) as the label background.
Here is a selection of quilt labels I have made, with the personal details removed. Some of the quality (especially in the text) has been lost in converting them to show here; they print out beautifully - although this will depend on your printer and the fabric sheets.
 This is a simple label for a small swap quilt, using a 2-colour background to the text box.
 Another text-only label, for a quilt for myself.
 This label uses a copyright-free image I found on the internet, colour-manipulated in PhotoShop and edited in paint to create space for the text.
 The quilt that this label belongs to reminded me of a book, and this image was taken from the book. I pasted it into Powerpoint and added a border and a couple of text boxes.
 This label uses another internet-sourced image (inspired by the quilt design), again heavily edited.
 This label places a photo next to the text, rather than what I usually do, which is to use the photo as the background. This quilt was for a childcare staff member so I used James and Eleanor's childcare photo for that year.
 This label is for a baby's quilt, using a photo of the newborn baby as the background. I always included the baby's name and birthdate on these.
 Sometimes I have better inspiration for a baby quilt label. This is for a beach scene baby quilt, and you can see the name of the quilt reflected in the label. The arched widow was drawn (fudged!) in Powerpoint. The image, sourced from the internet, is of the beach near where the family lives.
 This is a label I designed, but haven't yet used, for a quilt to sell in my Etsy shop - which is why it includes my blog address, rather than anything personal. It's a photo I took myself, and lends itself perfectly to a quilt label, with it's large open spaces.
 Another label using one of my own photos; the photo choice was clearly inspired by the quilt's name.
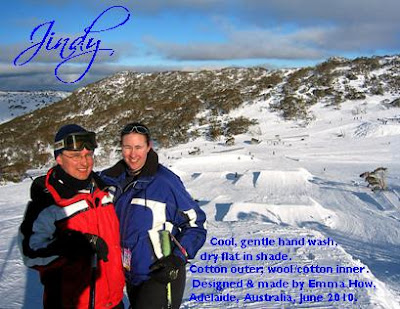 This label uses a photo of Simon and I, taken by my father. It's for my own winter snuggle quilt. Jindy is the familiar name for Jindabyne, the town used as a base for the New South Wales ski fields, incuding Perisher, where this photo was taken.
I don't always include all the information I should on my quilt labels - sometimes the desire to use a photo which doesn't leave much text space overrides good intentions! I should also point out that I don't have any special graphic design skills or software.
I hope this has provided you with some useful information ind inspiration.
My preferred brand is Matilda's Own, an Australian brand which is beautiful quality. Printed Treasures is also excellent, and Electric Quilt do a beautiful heiroom quality Cotton Lawn - although that's rather expensive. If you want a pure white try June Tailor, but I find her sheets a bit stiff, and they aren't cut evenly across the weave, so need to be tugged back into shape after rinsing. In Australia, you'll pay about $30 for a pack of 5 A4/Letter sheets. There are cheaper brands around, at about half the price, but I've found them rubbishy, and wouldn't waste my money on them. You do need to be careful about washing the labels - use a mild detergent, and dissolve it in the water before immersing the quilt.
While you can cut the sheets before printing them, I find it best to work with full-size sheets. Depending on the labes size, I fit anywhere between 2 and 5 labels per sheet, and try to do a whole sheet-full at a time. Always do a test-print in black-and white on plain paper to ensure the labels fit, with a seam allowance all around. The fabric sheets may need help to feed them into the printer - follow the instructions on the packet. Sometimes a strip of masking tape across the leading edge on the back helps feed it in properly.
Since late 2007, all my quilts have a personalised label, printed with my inkjet printer, and invisibly hand-stitched to the back of the quilt. In that time I have increased the amout of information I include, and most labels include:
- The quilt's name (I started naming all my quits around the same time)
- My name and location
- Reason for making the quilt (e.g. swap, recipient's name)
- Who the quilt is for
- Personal details, such as the baby's birth date and a personal message
- The month and year the quilt was finished
- Fibre content of the quilt (inner and outer)
- Care instructions
- Design details (mine are originals, but you should reference a pattern, for example)
- When the quilt was started
- Information about the fabrics
- Infromation about the process of making it
- Contact details (address, phone, email or website), should the quilt become lost or stolen
I often base my labels on a photo - I love to use a newborn photo for baby's quilts, for example. You need a photo of reasonable resolution (probably about 1000 pixels across, depending on the finished size). I often edit my photos in Photo Shop first, making them very sharp and vivid (possibly more than I usually would for regular viewing or printing). The photo also needs to have enough open space for the text - this needs to be plain enough that the words can be clearly read, so a single colour, with minimal variation in tone, and not highly textured.
Inspiration for my quilt names and labels come from the designs, the reason it was made, colours used and other sources. Sometimes it's hard to come up with a name. Sometimes the name inspires the label. Sometimes I even use an image of the quilt (often edited) as the label background.
Here is a selection of quilt labels I have made, with the personal details removed. Some of the quality (especially in the text) has been lost in converting them to show here; they print out beautifully - although this will depend on your printer and the fabric sheets.


I don't always include all the information I should on my quilt labels - sometimes the desire to use a photo which doesn't leave much text space overrides good intentions! I should also point out that I don't have any special graphic design skills or software.
I hope this has provided you with some useful information ind inspiration.
Friday 17 September 2010
Through the Arched Window
My next Beach Scene Quilt is complete! As I made this, I developed the pattern for it. It's all written and edited, now I need to deal with the pattern pieces. They're ready to take to get scanned tomorrrow so I can then finish them digitally. Then I need to get them printed. And figure out how to turn the thing into a PDF pattern. The PDF-to-be version is about 40 pages long, with 77 photos! Both that and the hard copy also have some diagrams. Any tips on PDFing a pattern (especially the pattern pieces on A2 sheets, so they print out the right size) would be most welcome.

The name for this quilt comes from Playschool, and the arched-effect of the centre panel plus the sun. The arched window was always my favourite!
More photos when I launch the pattern - hopefully in a week or two.
Thursday 16 September 2010
Elephant flannel
Last night I finally cut into the gorgeous elephant flannel Valori sent me. It took me a while, because first I had to meet a couple of deadlines, then I got sick, and then I couldn't come up with a design which suitably showcased the fabric.

Last night I made 13 of these blocks - finished size 6in. The rows of elephants are such that a 2.5 x 4.5 rectangle perfectly fits 2 elephants plus the 1/4in seam allowance. Unfortunately this did mean I had to slice parts of evey 3rd elephant.
 This block is made by starting wtith a part seam to join the first rectangle to the centre square.


 And the final step is to complete the initial part-seam.

To the 13 of these, I will add 8 plain blocks (fabric yet to be determined; I wanted to use more of Valori's matching prints, but they compete too much with the elephants, so tomorrow I'll look for some paler, subtler options) and four quarter-square-triangle blocks (above), which I also pieced last night.

Last night I made 13 of these blocks - finished size 6in. The rows of elephants are such that a 2.5 x 4.5 rectangle perfectly fits 2 elephants plus the 1/4in seam allowance. Unfortunately this did mean I had to slice parts of evey 3rd elephant.


Then it's just a case of adding the second, third and fourth rectangles one at a time.


To the 13 of these, I will add 8 plain blocks (fabric yet to be determined; I wanted to use more of Valori's matching prints, but they compete too much with the elephants, so tomorrow I'll look for some paler, subtler options) and four quarter-square-triangle blocks (above), which I also pieced last night.
Subscribe to:
Posts (Atom)